What is the accuracy of the caliper?
The accuracy with which the linear dimensions of a part can be determined with a caliper depends on many factors. Apply different types and models of devices with different ranges of measurement and resolution. In order to obtain the desired accuracy, you should choose the right caliper design. Mechanical calipers have an accuracy of 0.1 mm and 0.05 mm. To obtain higher measurement accuracy, it is necessary to use an electronic caliper. With its help, a result is obtained with a measurement accuracy of 0.01 mm.

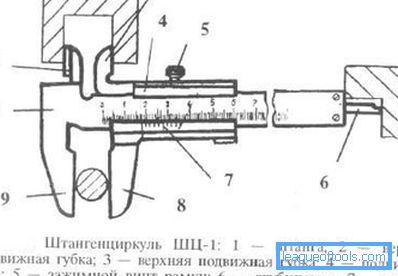
Scheme caliper SCHSCH-1.
Technical condition of the tool
One of the main requirements for the instrument is its purity. The device must be washed in kerosene or solvent and rubbed dry. Do not use the device covered with preservative grease. The appearance of a layer of metallic sawdust on the body of the device can be facilitated by its magnetization. Measuring with a magnetized caliper can significantly distort the result. During operation, tool wear occurs, a variety of deformations and irregularities.

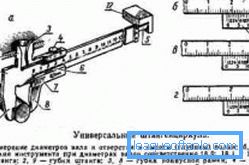
Scheme universal caliper.
To ensure the accuracy of measurements, calipers are subject to annual verification in specialized organizations. Mandatory inspection is carried out immediately before use. Checked the coincidence of the zero line and the absence of clearance when shifted jaws. Zero reading should also be when checking the depth gauge on a flat solid plane. The movable jaw carriage must not move under its own weight. The caliper must be protected from falling onto a hard surface. The electronic device must be replaced in a timely manner power source. The scale of the device should not be erased or covered with scratches. The line of the device should be flat. On the scale of the vernier division should be clearly visible.
Back to table of contentsThe influence of the human factor
Of great importance at the time of measurement is the human factor. The measurer must possess certain skills. When reading calipers, the line of sight should be perpendicular to the plane of the carriage on which the vernier scale is located. The caliper gauge should be located in the plane of the section to be measured. The left hand holds a fixed sponge, and the right hand controls the movement of the carriage. Before direct measurement of the measurement, the sponges are pressed against the part by applying an external touch to the sponge. After pressing, be sure to tighten the locking screw on the carriage. This action eliminates the skew of the carriage relative to the body of the caliper. If the screw is not clamped, the vernier scale rotates to a millimeter scale at an angle, which leads to false readings.
The correct position of the caliper relative to the measured part is ensured by special projections in the configuration of sponges in some designs of devices. When measuring a part of a round section, the slide of the caliper should fit tightly on the end of the part, provided the end is perpendicular to the part axis.
With some practice, all these subtleties are assimilated to automatism. This is clearly seen if you compare the work of a novice with the actions of an experienced measurer. In a person with the necessary skills, measurement accuracy is ensured after 1 measurement, while for a beginner with several measurements different results are obtained. When measuring, the state of the measured part is of great importance. For example, with a high roughness it is necessary to take an average value from several measurements.
Accuracy depends on the temperature of the device, so you need to make sure that between measurements the instrument is in a place precluding its excessive heating.
The temperature of the measured part is also important, therefore all measurements of parts of internal combustion engines are carried out in a cooled state and at the temperature specified in the technological instructions.
In addition to the above factors, the correct measurement score is important. It is considered to be an absolute error half the price of the division of any device. When measuring with a caliper with a resolution of 0.1 mm, after the measured value obtained, write "+/- 0.05 mm." The statement that the size is more accurate is not allowed.