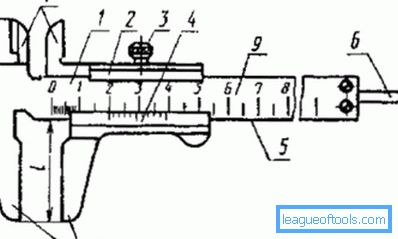
Device of various types of calipers
Calipers are the most popular tools for determining the exact internal and external dimensions and depth, the device of the caliper is quite simple, but may vary slightly depending on the design and type of reporting.

Figure 1. Two-sided caliper with depth gauge: 1 - bar, 2 - frame, 3 - clamp, 4 - nonius, 5 - surface with divisions, 6 - depth gauge, 7 - edge surface of the sponge, 8 - flat sponges, 9 - bar scale.
Consider a detailed description of such a useful device, as well as a variety of uses, depending on its type.
Main types of reporting devices and their application
The caliper is simple, with all its elements so compact and conveniently folded, that its use is very convenient and compact. And it can be used in different ways, since the measurements that are performed using such an instrument are very important in the fields of industry and construction. The use of tools makes it possible to obtain linear measurements of various objects from both their internal side and the external one.
According to GOST 166-89, devices are manufactured with different readings:

Figure 2. One-sided caliper with a depth gauge for external measurements: 1 - bar, 2 - frame, 3 - clamp, 4 - nonius, 5 - surface with tick marks, 6 - depth gauge, 7 - flat jaws, 8 - bar scale.
- On the nonius (SHZ).
- With a dial in the form of a rotating indicator device (CHIC).
- With a digital device (SHZTs). Such devices can be connected to a computer.
Tools type SHZ produced in 1 and 2 accuracy class, where the value of the reference can vary in the range of 0.05-0.1 mm. They are used to establish the linear dimensions of objects and the implementation of the markup. Thanks to the auxiliary scale, it is possible to determine the most accurate number of division fractions of both the outer and inner dimensions of the unit. Highlighting ShZ-I (devices with two-sided arrangement of sponges and counting, used to measure direct measurements and depth), ShZ-II and ShZ-III (tools with two-and one-sided placement of sponges used to mark the measurements and drawing markings).
Tools CHIC produced in 4 versions with different ranges of measurement. Apply such devices when the reading on the SHC is difficult or does not accurately determine the size. Reporting tools of the indicator type allow to combine the arrows with zero division of the scale.

Figure 3. Two-sided caliper: 1 - bar, 2 - frame, 3 - clamp, 4 - vernier, 5 - surface with divisions, 6 - depth gauge, 7 - edge surface of the sponge, 8 - flat sponges, 9 - bar scale.
The digital device allows not only to simplify the measurement process, but also to perform the following functions:
- Display the set data in a digital code with an indication of the sign.
- Record the results of recent measurements.
- Install from scratch.
- Transfer information to any measurement system.
- Connect to a PC, which allows you to process and save the results.
The marking of the SHTZ devices implies first of all an indication of the type, then the design and the range of measurements are followed, and the resolution is indicated in parentheses.
Back to table of contentsDevice calipers on the design
Calipers are made of the following main types of design:

Figure 4. One-sided caliper: 1 - barbell, 2 - frame, 3 - clamp, 4 - vernier, 5 - surface with tick marks, 6 - depth gauge, 7 - sponge edge surface, 8 - flat jaws.
- I - are two-sided instruments in the composition with a depth gauge (Fig. 1). According to the drawing, the number 1 is the bar, 2 is the frame, 3 is the part that performs the clamp, 4 is the nonius, 5 is the surface with all the divisions, 6 is the depth gauge, number 7 indicates the edge surface of the sponge that measures the internal dimensions, 8 is flat sponge for measuring the external parts of the part, the last number 9 is the bar scale.
- Т-I are one-sided instruments with a depth gauge for determining external measurements of objects with a hard surface (Fig. 2). In the drawing, you can see the similarity with the previous type, the only difference is that such calipers do not have parts to establish internal dimensions.
- II - double-sided tools (Fig. 3). In general, the notation on the drawing is the same as that of type I, only under the number 8 there are sponges, which in addition to flat measuring surfaces also have cylindrical ones.
- III - one-sided (Fig. 4). In the drawing, there is no boom scale, and under the figure 8 there are sponges having only cylindrical measuring surfaces to determine the internal dimensions.
All types of calipers can be additionally equipped with a variety of devices in order to improve their functionality.