How to make a reliable milling table do it yourself
Milling table can significantly increase the efficiency and productivity. Available in a variety of models for a wide variety of hand milling. However, the price of finished products is very high. It is much more profitable and more interesting to assemble a table with your own hands. No expensive materials and tools that are difficult to handle are required for this.

Diagram of the components of the milling table.
General information about the design of the milling table
The milling table can be installed on a working bench or a specially assembled separate table. The product must have a rigid structure and good stability, since during the work will be created very noticeable vibration. Be sure to consider the fact that the installation of the router will be performed from the bottom of the table top and absolutely nothing should interfere with it. No additional items are installed there.

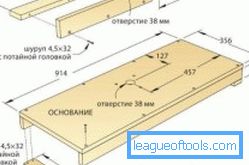
Drawing homemade milling table.
The design of the homemade table provides for a mounting plate, due to which the router will be attached directly to the table. To create a plate, use durable high-quality material: plywood, PCB, sheet metal, etc.
On top of the table top a sample is created under the plate. Directly the plate is fixed with the help of screws with a hidden head. Milling cutter is fixed with screws with the same hidden head. Additional fixation of the plate can be performed using clamps.
For easy turning on the router, a button is fixed on the table. Additionally, it is recommended to install an emergency button to turn off the type of fungus. If you have to work with large-sized blanks, equip the table with upper clamping devices. For even greater convenience and accuracy the table is equipped with a ruler.
For self-assembly milling table, you will need the following tools:
- Electric jigsaw. If not, you can do with a hacksaw.
- Plane. Desirable electric.
- Chisel.
- Shlifmashinka. In the absence, you can do with a bar with sandpaper, but processing with their help will require more time and effort.
- Screwdriver or drill with a screwdriver function.
- Electric drill with a set of drills.
The initial stage of the assembly table

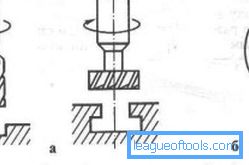
Types of cutters.
Explore your workshop and select a place to install the future milling table. Determine the most appropriate product design. Tables are:
- Aggregated. Inherently are lateral expansion of a standard saw table.
- Portable Very convenient and ergonomic desktop option.
- Stationary. It is installed separately and assembled purposefully for the router.
If your milling table will be used infrequently, or else you have to work outside the workshop, give your choice in favor of the portable option. If there is enough space, make a separate table. For more convenience, it can be equipped with wheels, which will allow, if necessary, "move" to another place.
You can assemble a small size design and install it on an ordinary table. You can take a chipboard of a suitable size and install a guide on it. The guide in this case is a board of relatively small thickness, fixed with bolts.
Take 2 clamps. Make a hole under the mill. On this the main work will be finished. However, if the machine is your main working tool, the process needs to be approached more thoroughly and create a convenient and reliable table at which it will be comfortable to spend time.
Back to table of contentsPreparation of the bed and countertops

Tools for the manufacture of milling table.
The bed is a stationary part of any milling table. At its core, it is a frame on supports with a table top on top. The frame material does not really matter. Suitable wood, metal, chipboard, MDF. The main thing is to ensure the required rigidity and maximum stability. The size of the bed is also not critical. Select them based on the size of the materials you most often have to process.
The lower part of the frame should be deepened by 10-20 cm in relation to the front overhang of the table top. Dimensions, as already noted, choose to fit your needs. For example, for processing the ends of the blanks of facades and door linings, you can make a bed 150 cm wide, 90 cm high, 50 cm deep.
A very important characteristic in this case is the height. The optimal value is 85-90 cm. It is good if you can equip the frame with adjustable supports. They will compensate for the unevenness of the floor surface and change the height of the milling table when such a need arises.
For the manufacture of homemade table, you can take an ordinary kitchen countertop from chipboard. A plate with a thickness of 26 or 36 mm with a wear-resistant plastic coating is used. Thanks to the plastic, the workpiece will slide well on the tabletop, and the chipboard will take on the task of canceling the vibration. In extreme cases, you can use chipboard or MDF with a thickness of at least 16 mm.
Back to table of contentsWhat you need to know about the mounting plate?
Next to the place of attachment of the sole of the router, the mounting plate must be fixed. The best is considered to be durable and at the same time thin material. Sheet metal is most commonly used. More convenient and no less durable option is textolite (glass fiber). Usually it is a rectangular plate 4-8 mm thick. In the center of such a plate it is necessary to prepare a hole. Its diameter should be the same with the diameter of the hole in the bottom of the router.
Sole of the router, as a rule, is equipped with standard threaded holes needed to fix the plastic lining. Thanks to these holes, the router is fixed to the mounting plate. With the initial absence of holes, make them yourself. You can use a different method of fastening the router, for example, metal clips-clamps. Holes for fixing the plate are created closer to its corners.
Back to table of contentsStep-by-step instructions for assembling the table

Drawing of the cover for the milling table.
First you need to fix the tabletop to the finished frame. A plate is placed on the pre-selected place on the tabletop. A pencil is taken and its outlines are drawn. Next, you need to take a hand mill with a 6-10 mm cutter and select a seat under the mounting plate on the table top. It should lie flush, i.e. make a perfectly flat surface with a tabletop, as if a whole.
The seat should have slightly rounded corners. You can round them with a file. After adding the mounting plate, take a cutter with a thickness slightly exceeding the thickness of the tabletop, and make through holes in the tabletop exactly in the shape of the bitter sole. You can not really try, perfect accuracy at this stage is not required. From the bottom of the tabletop you need to make an additional sample for the dust collector housing and other devices with which you plan to complete your milling table.
The work is almost completed, you just need to collect everything in a single product. Get the router on the bottom and screw it to the plate. Secure the plate to the table top with self-tapping screws. Heads of self-tapping screws need to be drowned, otherwise they will interfere in the process of doing the work. Finally screw the table top to the frame.
In order to increase convenience and safety, you can equip the structure with an upper pressure roller device. Such an addition would be particularly useful when processing large-sized blanks, such as door linings. The design of the clamp has no complicated elements, so that you without any problems will make and install it with your own hands.
As a roller, you can use a ball bearing of the desired size. The bearing is installed in a holding device. The device itself must be firmly fixed at the required distance from the surface of your table top. So you will provide a constant tight clamping of the workpiece to the surface of the tabletop at the time of passage of the product under the roller. This will increase the accuracy and safety of work performed.
Back to table of contentsDrive Installation and Safety Guidelines
Now you have the necessary knowledge to build a full-fledged milling table with your own hands. But if you are planning to create a full-fledged milling machine, in addition, you need to study information about the electric drive. Its most important characteristic is power. For a home machine with a shallow sample suitable motor for 500 watts. However, such a machine will stall periodically, so it is better to allocate money to buy a higher power engine.
In practice, it was found that the best option is an electric motor with a capacity of at least 1100 watts.

Assembly scheme milling table.
A 1-2 kW engine will allow wood to be processed using any type of cutter. Both stationary engines and drives of manual power tools such as grinders, drills, hand mills, etc. are suitable.
Special attention should be paid to such characteristics as the number of revolutions. The higher this figure, the more clean and uniform cut you can get. If the motor is designed for operation from an ordinary household network of 200 V, there will be no connection problems. In the case of asynchronous three-phase motors, the connection must be made according to a special scheme - a star-delta. It will ensure the highest possible output and safe smooth start. When a three-phase motor is connected to a single-phase network, the efficiency will decrease by 30-50%.
After you have assembled the table and selected a suitable electric motor, do not start work until you have learned the basic safety recommendations. It is highly desirable to equip the milling cutter with a protective screen according to the type with which the industrial milling tables are completed. The machine must be equipped with a so-called. fungus, i.e. button for emergency shutdown equipment. To install it, you need to choose an easily accessible place, at the same time thinking of everything so that there is no risk of accidentally pressing a button.
Additionally, you need to set the backlight of the working area, since place around the cutter is the most dangerous. If you have to work with different workpieces and change the height of the cutter's overhang, consider installing a manual or automatic mechanism for raising and lowering the cutter. It is possible to work on the improvement and addition of the design for a very long time, it all depends on your needs and imagination.
Thus, in the self-assembly of the milling table is absolutely nothing complicated. Just purchase the necessary materials, prepare a set of simple carpentry tools and do everything in accordance with the step-by-step guide. With the observance of technology, the home-made table will not yield to anything in a factory-made product, but its price will be much lower. Do not forget about safety. Have a good job!