How to paint the ceiling in the room with a roller
The quality of used paint materials directly affects the quality of the painted surface. However, even an excellent tool can not guarantee a beautiful and durable ceiling structure, if we neglect the quality of the tools used and do not comply with the technology of painting works.

Painting the ceiling is a reliable, durable coating that is easy to apply and is relatively inexpensive.
How to choose a roller for painting the ceiling?
Most of the ceiling structures are large and smooth bases, and therefore the most suitable tool for painting is the paint roller. To date, the sale can be found a sufficiently large number of similar tools of different types and forms, in connection with which the beginner may have difficulty in choosing.

Types of rollers for painting.
In most cases, the following rolls are on sale:
- foam rubber;
- Velor;
- fleecy.
Their prices are practically the same, but this does not mean that these tools are the same. Differences will be significant, so when choosing a roller, the following nuances should be taken into account:
- A tool with a long nap is the optimal choice.
- Velor or foam tools will absorb excess paint that accumulates on the ceiling structure. As a result, bubbles will appear on the base.
- The rougher the base of the ceiling, the longer the pile should be at the roller. Thus, the paint will be able to cover all the texture and fill all the potholes.
- In the process of choosing a tool, you need to squeeze it in your hand: a high-quality device will not be deformed during compression.
- You will need to carefully examine the joint. In a quality fixture there is no seam or fabric joint, since these elements leave strips on the ceiling structure during dyeing.
- Next, it will be necessary to check the villi for strength by pulling them towards you: no villus will fall out in a quality product.
How to paint the ceiling: preparation for painting
In order to paint the ceiling, you will need to prepare the following tools:

Before painting, the ceiling is cleaned from the old coating and spatula.
- rollers of the big and small sizes;
- wide and narrow paint brushes;
- plastic tray for paint and roller;
- handle for a long roller;
- masking tape;
- rags without pile.
Before painting the ceiling will need to perform some work on the preparation. The sequence of actions will be as follows:
- First of all, furniture is taken out or protected with a plastic film.
- Chandeliers and lamps are removed, they can also be covered. After dismantling the fixtures, you will need to take care of mobile lighting.
- Reliable insulation of all electrical wires is performed.
- The floor base is covered with old newspapers or polyethylene film.
- The masking tape glued all the places that will not need to be painted.
How to prepare a concrete base for painting?
Today, the concrete base is quite rare. To paint a ceiling from concrete not for long. You will need to complete the following steps:

The concrete ceiling is leveled and primed before painting.
- The first step is to evaluate the condition of the base. If it has old paint, you will need to wash it out. In this case, you can use a variety of special compositions for removal. They can be applied to the paint with a brush.
- After applying such a tool will have to wait until the paint withers.
- If it is not possible to completely remove the old layer of paint in one go, then the same actions should be performed until the paint is completely removed from the base.
- In most cases, on the packaging of such means for removal there is a detailed instruction, according to which you can easily perform a wash.
- If whitewashing is on the ceiling structure, it should be rinsed with acetic acid, which should be pre-cooked. After that, the surface must be thoroughly washed again with an ordinary detergent, dried, and only after that new layers of coloring agent can be applied to the ceiling.
- To wash off the emulsion paint is quite simple, since this tool consists of half of the water. This paint can be washed off the base of ordinary water with the addition of detergent. It should be noted that this is a long process, because it is still recommended to use a special remover. The effect of this remedy should be slightly weaker.
- Before painting the concrete surface, you will need to apply a layer of impregnation and primer.
How to prepare for painting the ceiling of plasterboard?
In most cases, this surface is not subject to lengthy preparation. Gypsum plasterboard sheets hold on well any type of paint. It will be necessary to perform only the following preparatory stages:

Plastered ceiling should be sanded.
- It is necessary to pay special attention to the joints of sheets of finishing materials: they must be invisible. To do this, before painting, coat the seams with a putty mixture. Similar actions need to be carried out on the caps of the self-tapping screws, by means of which the sheets of drywall are fixed to the framework of metal profiles.
- On a similar basis, it is necessary to apply a primer.
Ceiling painting technology
In most cases, the ceiling is painted with a roller as follows:

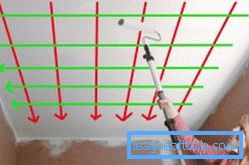
Directions of painting the first and second layer.
- The base is prepared by cleaning it from old finishing materials. In this case, it is best to use a spatula.
- The base is cleaned of dust with a brush.
- Cracks and seams are putty putty.
- The surface is primed. Primer must be made. If this is not done, then in the future the paint may begin to crumble. This mixture will create a moisture-proof layer that prevents moisture absorption from the coloring agent.
- Borders and corners are painted. Using a roller, you can rub the paint on the base with high quality, however, for this tool will need free space. That is why the first thing you need to paint all the corners and protrusions, avoiding stains of coloring agent on the base. In this case, it is best to use a brush, since the extreme part of the roller can damage the corners. Experienced specialists paint a thin strip along the perimeter of the ceiling construction 4–5 cm wide with a similar tool to facilitate the work with the roller.
- Painted ceiling base in one or more layers.
Sequence of actions for painting the ceiling with a roller
When all the necessary tools and materials have been acquired and the preparatory work is done, you can paint the ceiling with a roller.
If there is no experience in performing such work, then it is recommended to practice painting any of the walls, which in the future will, for example, be covered with wallpaper.
To properly paint the ceiling with a roller, you must perform the following steps:

Option trajectories staining the ceiling.
- Paint is poured into a plastic container.
- The roller is dipped into the paint and carefully rolled over the ribbed base of the container. The roller should be dipped to the handle. In this way, it will be possible to rid the instrument of excess paint and unwanted drips on the ceiling structure.
- Care should be taken to ensure that the base of the roller gets wet evenly. In this case, to remove excess paint, you can optionally use a brush.
- A roller is put on the extension, after which the first coat of paint is applied. You need to start painting from the corner that is furthest from the entrance. Paint the ceiling is recommended during daylight hours.
- Paint is applied to the ceiling structure with parallel stripes. It is important to ensure that the layer does not dry out the edge of the coloring agent.
- It is necessary to paint overlap, capturing approximately 8-9 cm from the next strip. In the process of painting the ceiling construction paint should be carefully rubbed. All movements should be smooth.
- If you plan to paint the ceiling in several layers with a roller, then you should make sure that the last layer is located in the direction of the windows, and the previous one is perpendicular.
- The new layer should be applied only after complete drying of the previous one.
If you choose the right tool and carry out all the necessary preparatory work, then you can paint the ceiling with a roller any person who at least once held a paint brush in his hands.