How to sharpen the drill bit for metal
The fact that in the process of working a metal drill has the unpleasant property of becoming dumber does not require any special proof. And this happens the faster, the more often the drill stays in work and the more work they do.

The bit for metal after a short use becomes dull and requires sharpening.
Many people do not pay attention to it and continue to work until the drill finally fails, and then throw it out and buy a new one. This happens because the owners simply do not know how to sharpen the metal drill. In the meantime, this can be done at home, using tools and tools available in almost every home workshop.
Signs of a blunt drill

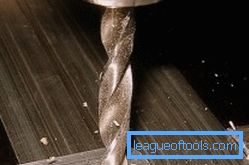
If at a contact of a drill and metal the sharp creak will be heard, then the drill has become dull.
Drilling metal can only be a very sharp tool. If at the beginning of drilling you hear a sharp creak at the point of contact between the tool and the metal, then this is a sure sign that the drill is blunt. Hearing such a nasty sound, it is better to stop working. Otherwise, the tool, rotating, will rub more strongly against the metal, respectively, it will generate more heat during the drilling process. From the friction and heating of the working edge of the drill will wear out faster.
Domestic craftsmen for their needs use mainly small drills, Ø not more than 16 mm. For sharpening blunt tool is better to use special equipment. But it is quite expensive, so for the house it is rarely purchased. But in any home workshop you can figure out a sharpening tool from the tools at hand. Sharpening can be done with:
- grinding machine with abrasive wheel;
- grinding machine;
- electric drills with interchangeable nozzle.
You can use any other sharpening device on which you can install the grindstone and make it rotate. It is only necessary that such a device could provide a speed of rotation of the shaft up to 1500 rev / min.
Back to table of contentsPreparation for work

For your safety, use protective gloves and goggles when sharpening the drill.
But before starting to work, you need to wear safety glasses and gloves and prepare a container with water. These are mandatory safety devices, without which it is very dangerous to sharpen metal tools.
During operation, sparks and microscopic metal dust particles fly off from the sharpener and tool and fly away in different directions. If you do not protect your hands and face, then these microscopic particles can quite sensitively cut through the open skin. But they are particularly dangerous for unprotected eyes. Once in them, metal dust particles cause serious vision problems, up to its complete loss.
A container of water is needed to cool the sharpened tool, because during sharpening it is very hot from friction on the rotating plane of the circle. If the drill does not cool in time, it will inevitably overheat and will quickly break down later in the process.
Back to table of contentsSharpening technique and sequence

The design of the drill metal.
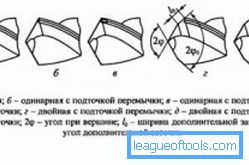
But cooked tools and protective gear are only half the battle. You can not take up work, not knowing how to properly sharpen the drill. After all, this process, though simple, requires strict adherence to the sharpening sequence. It is also very important to initially correctly determine the type of sharpening. The type is determined by what form you need to give the cutting edges ("feathers") of the tool. There are single-plane, two-plane, conical, cylindrical and screw sharpening.
To determine the correct or incorrectly sharpened drill, you need to carefully consider it after sharpening. The factors for correct sharpening the drill are as follows: it should remain symmetrical about its axis. Its cutting edges must have the same length with respect to the axis of the drill and the same angles of tapering.
Sharpening always starts from the back of the drill. The surface should be pressed tightly to the grinding wheel, while maintaining the initially specified angle during the whole process. Without the skills to do everything right the first time is very difficult, so be prepared for what will have to do several approaches. After each approach, you should carefully examine the surface being sharpened. Work continues until the rear surface becomes similar to the right cone, if you look at it from the side, at eye level.

Types of sharpening drills.
Only having achieved the desired result, you can begin to sharpen the cutting part. Fulfilling it, you need to strive to ensure that both “feathers” are sharpened absolutely identical. It is also very important to maintain the correct angle when working.
With a one-plane sharpening, the back surface is processed in the form of one plane, keeping an angle in the range of 28-30 °. This is one of the easiest ways to use for thin instruments, up to 3 mm in diameter.
Performing work in this way, the drill is pressed at a predetermined angle to the grinding wheel. While sharpening, the tool does not turn over and moves. Often this leads to the fact that the cutting edges of the drill can crumble, especially if the metal caught a low quality.
It is preferable to sharpen the cutting part of larger diameter drills conically. This is a more complicated way, and if for some reason you value the tool being sharpened, then first it is better to practice on some broken surface in order to “fill” the arm.

Conical method of sharpening the drill.
The technique of this method is this: with the left hand the instrument is taken over the working part, and with the right hand it is taken over the tail. Keep the working part as close as possible to the intake cone, otherwise high-quality sharpening will not work. In this position, the drill is pressed not only by the cutting edge, but also by the surface of the back part to the end of the sharpener. Holding the tail by the right hand, the drill slowly and smoothly rotates so that a tapered surface is formed on the back face of the drill. After the end of the sharpening of one pen, the tool turns to sharpening the other, and everything repeats again. A very important nuance for this method: during sharpening the pen, in no case should the drill be torn off.
There is another technique of conical sharpening. The drill is also taken with the left hand at the working part, and the right hand at the tail. But the drill is pressed to the end of the sharpening bit only with a cutting edge, and then during work, without tearing it from the sharpening tool, the tool rotates smoothly around its axis, achieving uniform and high-quality sharpening of the back surface.
With this method of sharpening from both sides on the back of the pen you will get a cone, but the drill will remain without a cleaned back corner. Therefore, when working, such a drill will rub more against the metal and, accordingly, heat up more.
Back to table of contentsLittle tricks
During the work, you should try to keep the factory shape of the back of the drill as much as possible. This simple technique greatly helps to withstand the correct angle of sharpening. Conical sharpening is quite sufficient for drills up to 10 mm in diameter, for drills of larger diameter it is necessary to make an additional point under the surface of each pen.
At the time of undercuts, the leading and trailing angle decreases and the angle of the cutting edge increases. This allows you to increase the life of the tool by reducing the width of the transverse edge, which does not drill, but scrape the metal in the drilled hole.
Professionals advise sharpening the drill always lead on the counter-movement of the sharpened.

Figure 1. Drill sharpening patterns.
This simple technique makes the instrument's pen more durable; it is less likely to be crushed and broken off. In a production environment after sharpening the drill always perform its fine-tuning. This allows you to remove from the surface remaining after sharpening small nicks, making it smoother. Such a surface is much less susceptible to wear than after normal sharpening. Therefore, if there is such an opportunity, the refinement should not be neglected.
To determine whether the tool is properly sharpened, you need to carefully consider. Indicators of the correct sharpening are as follows: the tool must remain symmetrical about its axis. Its cutting edges must have the same length with respect to the axis and the same angles of tapering. And in order not to be mistaken, it is better to check the correctness of its sharpening with a special pattern in Figure 1, where a is the general view, b is the pattern for checking the apex angle and the pen length, c is the sharpening angle pattern, d is the angle pattern between the web and cutting edge .
Sharpening a blunt drill for metal is not a very difficult process, but when performed at home it requires concentration, patience and perseverance from the contractor. If you possess these qualities, then you can safely get to work. In the opposite case, it is better to perform it under the supervision of a more experienced person.